- Other Fluke companies:
- Fluke
- Fluke Biomedical
- Fluke Networks
- Fluke Process Instruments
Accurate Fever Scanning with Infrared Forehead Thermometers: Issues, Solutions and How to Calibrate

Because of the COVID-19 pandemic, there is a lot of interest in measuring human body temperature. I’m sure you’ve seen articles or you had your own temperature measured as you entered a public place like a store or medical building. Most of the interest in measuring human body temperature is in the area of non-contact or infrared (IR) temperature measurement. Infrared measurements are ideal for this fever screening because making the measurement only takes a few milliseconds, and you don’t have to touch the person or object you are measuring, which helps prevent further spread of CoronaVirus.
Article overview
We know a lot about radiation thermometry here at Fluke Calibration. We manufacture some of the best IR calibration standards in the world and our experts are recognized in the metrology community. For example, Frank Liebmann is a recognized expert in the field, and he has contributed many technical articles and scientific papers on this subject. Frank has trained hundreds from around the world on proper methods for performing IR temperature measurements and calibrations. Thanks to Frank and other Fluke IR experts, we can provide answers for the challenging questions you may have.
In this post I’m going to answer some basic questions about IR thermometers for human fever screening, such as how they measure, some of the challenges with using them for human body temperature measurement, and how to check the accuracy to know that an instrument is living up to its claimed specifications.
We’re also working on more technical content which will be published at a later date. If you are interested in being informed about that, please sign up for our email list.
Can infrared thermometers measure human body temperature?
Whether you can use infrared thermometers on humans depends on the type of thermometer being used. Industrial IR thermometrs are NOT designed for measuring human body temperature and should not be used, but IR thermometers designed for use on humans may be used. We'll talk about why industrial IR thermometers should not be used on people, and we'll also tell you what you should look for in an IR thermometer designed for human forehead temperature measurement, like the Fluke 67 MAX Clinical Infrared Thermometer.
Using infrared thermometry to measure human body temperature
Many IR thermometers designed for human fever scanning have entered the market to address the COVID-19 need but sadly, some of the basic information that you need in order to choose a thermometer or assess its reliability is not easily available. I went online and looked at a popular thermometer and the published information about it did not have any mention of wavelength, emissivity or spot size, and those are important parameters that we'll discuss after we address a few basics, such as how to choose an infrared thermometer.
How to choose an infrared thermometer by examining the standards
To choose an infrared thermometer, start with the industry standards. The best standard for choosing an IR thermometer that I have seen is ASTM E 1965-98. ASTM requires that if you are going to use an IR thermometer for measuring skin temperature, it must be accurate to within ± 0.3 °C (±0.54 °F). That is just to ensure that it’s good enough to detect if a person’s temperature is different than what it should be, or if they have a fever. Infrared thermometers for measuring ear canal temperature have an even tighter requirement of ± 0.2 °C (±0.36 °F). There are several other requirements described in ASTM E 1965-98 that all help you know what to look for in a qualifying thermometer. And, depending on where you live in the world, there will be similar standards, like this one, to help you know what is required in the region where you live.
Skin temperature and body temperature are not the same
Since infrared forehead thermometers are used to measure human body temperature, they should be FDA approved for clinical use, like the 67 MAX. They also should be able to switch between adjusted mode and unadjusted mode, or measurement mode. Adjusted mode is a compensation for the difference between skin temperature and body core temperature. Unadjusted mode is required for checking or calibrating the IR thermometer using an IR calibrator tool.
Skin temperature is not the same as body core temperature. The thermometer has to compensate for that. As an example, I used an IR thermometer to measure my own forehead temperature and it gave me a really low reading. If the thermometer doesn’t have the adjusted mode, it’s designed for industrial thermometry applications with a wide temperature range. If you don’t have this adjusted mode you get a reading that’s about 3 °C (5.4 °F) low, because of the difference between skin and body core temperature.
Another challenge is that human temperature varies based on several factors. Different people have different blood flow to their foreheads, and temperature can also vary due to other factors like sweat or simply from being outside in hot weather. Someone may be wearing a hat or helmet and they may have hair covering the forehead. Some companies are screening people coming through the front door with a process that includes a contact thermometer; that is, if they see an anomaly on a person’s temperature when taken with a non-contact infrared thermometer, they take that person to another area where they use a contact thermometer to make a better measurement.
How infrared thermometers work
Understanding the basics of how an IR thermometer measures will help you understand the key points of using them for fever screening. When you measure the temperature of a target, that target is emitting energy in the form of infrared light. The infrared light, or energy, passes through the atmosphere and goes into the IR thermometer’s optics. The optics focus the energy onto a sensor or a detector and then some electronics process the signal and convert it into either a display temperature or a thermal image, depending on what type of thermometer it is.
It’s a key point that we are measuring thermal energy. It can be confusing because many of these devices have a laser pointer mounted on them and people think it’s some kind of laser measurement that is measuring temperature at the point of where the laser is pointing, but that’s not the case. The laser pointer is there just to help you know where you’re measuring. You’re actually measuring energy as it’s coming off the object that you want to measure. The built-in laser pointer is more common with industrial IR thermometers. Usually forehead thermometers don't have this feature due to the risk of shining the laser in the person's eyes.
Are infrared thermometers dangerous?
I‘ve heard about social media posts with theories that IR thermometers can damage your brain. I want to clarify this is absolutely not the case because these devices don’t output any energy, they only sense energy. If your thermometer has a laser pointer built into it, you should turn it off because you don’t want to shine it in someone’s eyes.
What is a fever scanning system?
People have also asked about fever scanning systems. When I refer to a scanning system, I mean a system that uses a thermal imager, perhaps something in the entry of an office building, that takes a thermal image of people as they walk into the building. The better systems employ an ETRS (a black body with known emissivity and temperature) to help remove temperature error in the thermal imager. A thermal imager is an infrared thermometer that takes a thermal image of a body rather than measuring just on a spot like a regular IR thermometer does.
How can you be sure the IR thermometer is measuring correctly?
We have heard from many Fluke customers who ask about how to calibrate and verify IR forehead thermometers. This is an important topic because people want to know if they are using a tool that truly works and meets requirements. When calibrating IR thermometers, including forehead infrared thermometers, it is important to understand and apply best practices around emissivity, wavelength and geometry.
Emissivity
Emissivity is critical because it describes how the energy is coming off the object that you are measuring. In technical terms, emissivity is the ratio of spectral radiance of a real surface to that of an ideal surface. The important thing to summarize about emissivity is that you should ensure you know what a thermometer’s emissivity setting is and, if it's configurable, you set it to have the correct emissivity setting.
Generally speaking, people consider skin to have an emissivity of 0.98 but ASTM points out that can vary from 0.94 to 0.99. Most IR skin thermometers appear to have emissivity locked at 0.98. Keep that in mind for when we come back to emissivity in the calibration discussion.
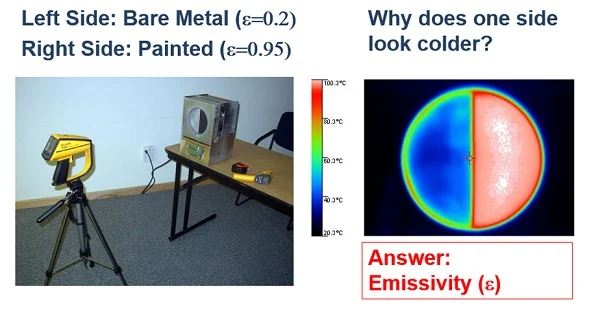
Those of you who use radiation thermometers already know that bare metal is difficult to measure with radiation thermometry, because the emissivity is so low. See below for a demo that Frank Liebmann set up. He took a flat plate infrared calibrator and left one side with bare metal and the other with paint, so the painted side has an emissivity of 0.95 and the bare metal side has an emissivity of approximately 0.2. Although the entire plate is at the same temperature, the thermal imager is tricked because of the emissivity issue. The thermal imager thinks that the left side of the plate is much colder than the right side. The lesson here? If you don’t account properly for emissivity, infrared thermometer accuracy will be questionable, and you can have readings that are way off.
Wavelength
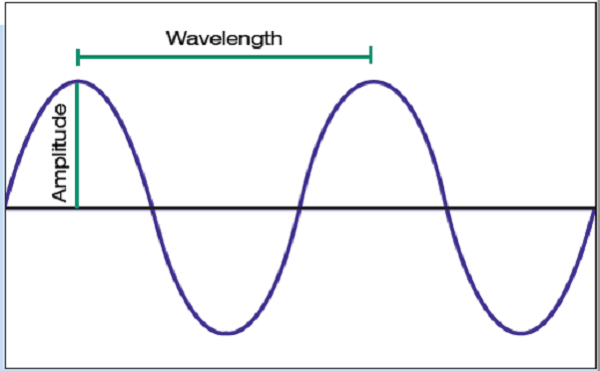
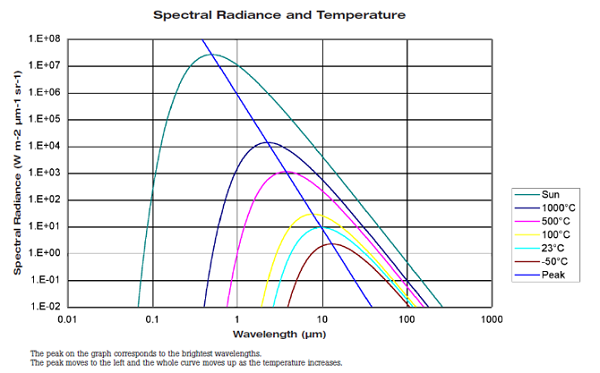
For measurements close to room temperature, a measurement signal with a wavelength of 8 to 14 µm is preferred. That is mainly because this wavelength band is not as sensitive to humidity and it provides enough energy to be detected reliably. You can see from the specifications what wavelength a thermometer works over. If you are going to calibrate infrared thermometers, make sure that the calibrator you use is calibrated on the same wavelength that you are measuring.
Geometry
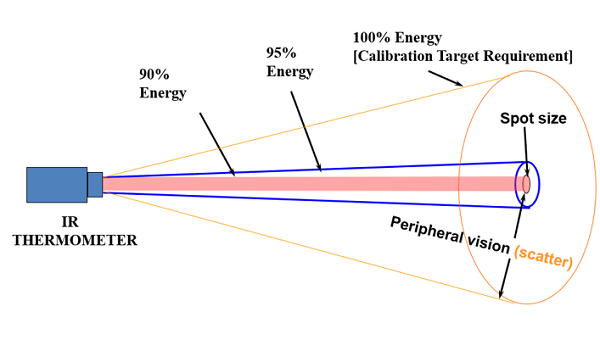
Measuring with an IR thermometer is an optical measurement, so just like binoculars and telescopes there is a field of view. The further away you are from something, the larger the field of view, and eventually you start getting temperatures from surroundings around the object that you’re measuring. You’ll need to find out what the IR thermometer’s distance-to-spot-ratio is. For example, if a thermometer has distance-to-spot-ratio of 12:1, that means that at a distance of 12 inches, the measurement spot (field of view) will be about 1 inch in diameter. For the types of thermometers used for forehead temperature measurement, it appears that many of them need about a 4-inch (10 cm) maximum measurement distance. This principle also applies to measuring forehead temperature. Low cost forehead thermometers may have such poor optics the thermometer may have to be almost touching the forehead to get reliable readings.
Summing it up
To recap some of the key points so far, you can help protect your company’s safety program by finding a way to verify or calibrate IR thermometers, especially if they’re going to be used for measuring human body temperatures. Use ASTME 1965-98 as a platform to base your knowledge on and see what the expectations are for these instruments.
If you’re calibrating an ear thermometer, ASTM E 1965-98 recommends a special IR cavity, which is not very common in industry. Even a flat plate IR calibrator is better than nothing if you need to check an ear thermometer, but keep in mind that there’s more you have to do to make things work.
Understanding your IR calibrator's specifications also matters
You can use a contact thermometer with a Fluke IR calibrator to get better uncertainties, although it’s challenging to do. You have to understand the uncertainties involved and how to configure the equipment properly. We’re working on more information to help you through this and will publish a technical paper or application note with more details. For now though, there are several educational resources available on the Fluke Calibration Education Hub – application notes, technical papers, and recorded webinars to help you begin to fill any gaps you may have in your knowledge of IR thermometer calibration.
How to calibrate an IR thermometer>
We want to help you with the simpler calibration method, which is to use a Fluke 4180 Precision Infrared Calibrator in its standard configuration. With this non-contact method measurement uncertainty is on the order of 0.5 °C (0.9 °F), but it is much simpler. A more complicated low-uncertainty method using a reference thermometer will be described in detail in future articles and application notes along with advice for calculating measurement uncertainty.
How to check the accuracy of an infrared thermometer designed for measuring human body temperature: general process
- Place the Fluke 4180 non-contact infrared calibrator in a location that is free of drafts. Ensure the 4180 is not facing other sources of heat energy (coffee makers, other calibration equipment, human bodies, windows).
- Set the 4180 to 37 °C (98.6 °F) and set the 4180 apparent emissivity setting to 0.98, the emissivity of skin, which also should be the emissivity of the DUT (device under test) thermometer.
- Allow the 4180 to arrive and stabilize at the set point, about 10 or 15 minutes.
- Ensure the DUT infrared thermometer has been in the calibration ambient conditions for at least one hour (an important part of IR thermometer accuracy is internal temperature, which needs to match the temperature of the calibration area for best results).
- Verify the DUT thermometer emissivity is set to 0.98. If the emissivity setting is unknown, we recommend labeling the DUT to indicate it is calibrated for emissivity of 0.98 only.
- Determine the measurement distance of the DUT thermometer, which results in a spot size of 2 inches in diameter or less on the 4180 target. If the DUT distance-to-spot ratio is unknown, use a distance of 10 cm (4 inches). It may be a good idea to move the IR thermometer closer and further from the target by a few cm to verify readings do not change due to a change in distance. Distance is measured between the surface of the IR calibrator and the front of the DUT thermometer (see diagram below).
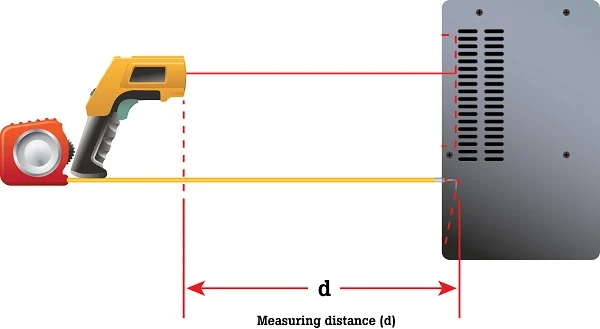
Measuring distance between an IR calibrator and thermometer
- Hold the DUT thermometer in front of the 4180. Stand to the side so your body heat doesn’t reflect off the 4180 target and into the DUT thermometer. Or use a partition like the one shown below to block body heat.
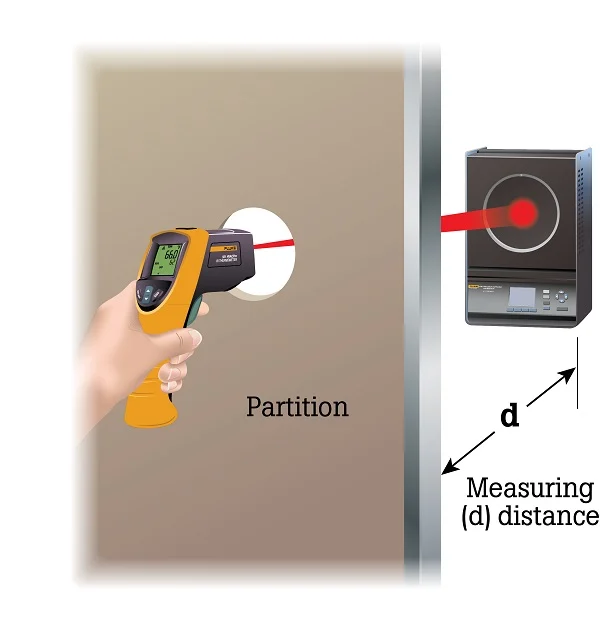
Using a partition to improve calibration of an infrared thermometer
- Take at least 5 readings from the display of the DUT thermometer while also noting the temperature displayed on the 4180.
- Calculate average and standard deviation of both the DUT thermometer readings and readings taken from the 4180 display.
- Calculate DUT error by subtracting DUT average from the 4180 average.
Resources and useful links
Related products
Get Help
-
Speak with a calibration product expert about your equipment needs
- Home
- Products
- New Products
- Electrical Calibration
- RF Calibration
- Data Acquisition and Test Equipment
- Temperature Calibration
- Humidity Calibration
- Pressure Calibration
- Flow Calibration
- Process Calibration Tools
- Calibration Software
- Service and Support
- All Calibration Instruments
- Purchase Info
- News
- Training and Events
- Literature and Education
- Service and Support
- About Us


